How To Add Green To Your Home’s Color Scheme
How to add green to your home's color scheme when styling your home
The color green is as versatile as it is varied. Green is a color inspired by nature. It comes in many shades, from light to dark. Undertones range from soothing blue to neon yellow. Green can be incorporated into color schemes to create a refreshing look.
01 of 19

Colors that go with green
Green is the most popular color for representing nature. It comes in many shades. The color is always fresh and vibrant, whether you choose seafoam green or fern in deep shades. It goes well with many colors, including neutrals such as brown and gray as well as vibrant shades like yellow, blue and pink.
02 of 19
How to Create a Green Color Scheme
Breakfast nook with green tiles and a cape Dutch-inspired gable.
To find the perfect color scheme for green, start by examining the undertones of your chosen shade. Green is usually a cool-toned color but some shades may lean towards yellow, brown or even red. You can identify undertones by comparing your green with different paint swatches. Then, use these colors to guide the rest of your palette.
03 of 19
Complementary Green Color Scheme
Bedroom in Dusty Peony, Grass Green and Pure White
Red and green, which are opposites on the color wheel of the wheel of colors, make a natural pair. Shades of green are paired with coral and dusty pink accents to create a new take on a classic combination. Bright white linens, a headboard and a table lamp provide a crisp background that makes the green throw and pillows pop.
04 of 19
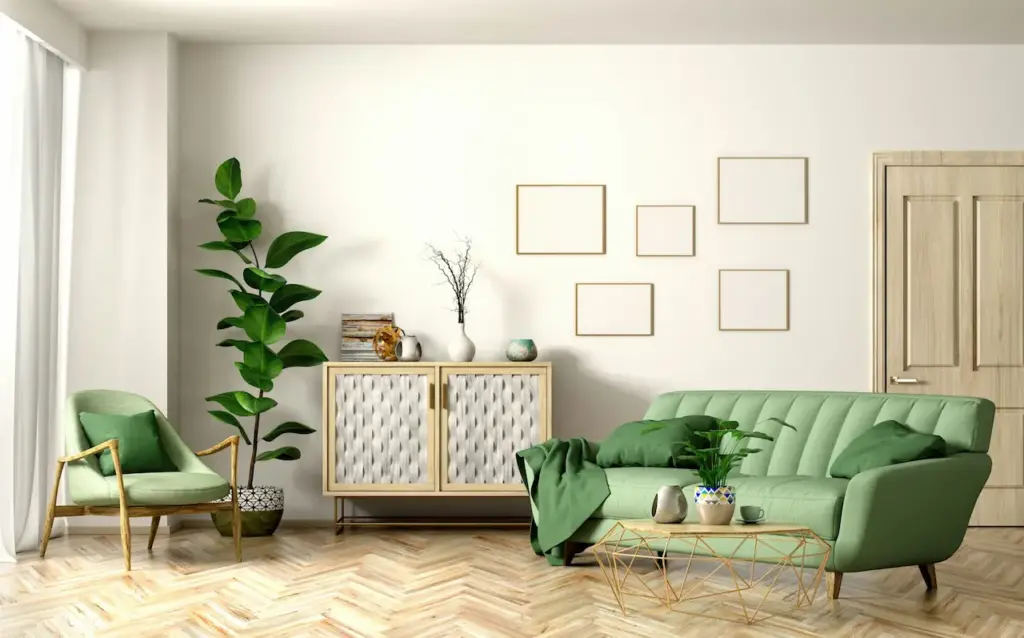
Color Scheme in Neutral and Green
White den with green couch
Greens with a cool-leaning, like jade, look great when paired with neutrals such as gray and white. This small living room features light gray walls with white trim that recede to the background, allowing a green velvet sofa to be the focal point. Black accents are added to the decor with accessories.
Country Garden Color Scheme
Green wood kitchen with shiplapped ceiling and rustic table
Leaf + Poppy + Weathered browns
This farmhouse-styled kitchen is refined with color to create a look that is quaint and classy. The light leafy green cabinetry creates a feeling of freshness that reflects what’s outside the window. Wood floors and a weathered farm table provide a natural texture to the palette, while accessories and fresh flowers add vivacious color.
06 of 19
Beachy Green Color Scheme
Two beds in green and blue bedroom
Neon Green + Orange + Turquoise
In this bright guest room, twin bed frames are painted in a vibrant shade of neon-green. This vibrant color is the foundation for a coastal-inspired scheme of soft teals and oranges. The large windows with their gauzy curtains will provide plenty of natural light, creating a welcoming atmosphere.
07 of 19
Bold Green Color Scheme
nook bench storage compartments blue green decor
Key Lime + Ocean Blue and Off-White
This small dining area is brought to life with vibrant green accents. The fabric of the banquette, pillows and chair are all upholstered in the same bold color, which is complemented with a strong turquoise. The large prints on the rug, curtains and chair create visual energy which helps to make the room appear larger.
08 of 19

Country-Inspired color scheme
Kitchen with green cabinets, wooden beams and wooden beams
Sage Green + Creamy white + Natural wood
In this country-inspired space, a muted shade sage green is used as a neutral. Simple open shelving and white painted floor balance the color of lower cabinets. Exposed wood beams accent tall ceilings. The same texture is also repeated on the butcher-block counters. Vintage copper pots are hung from a rack over a row of windows, adding a shimmering accent to the color palette.
09 of 19
Analagous Color Scheme
Teal Room
Emerald Green + Summer Sky
When choosing a color scheme, it is always best to choose colors that are similar, or adjacent on the wheel. In this scheme, sapphire, sky, and cerulean blues are combined with jewel green. Restrained graphic patterns are used to create a relaxing atmosphere.
10 of 19
Color Scheme: Refreshing Green
Living room
Mint Green + Summer Brilliants
The mint-green walls and the pair of chairs in blue-green serve as neutrals, allowing the accent colors to be the focal point. The vibrant colors of orange, pink, yellow and blue are emphasized by the shades. The rug and fabrics have subtle variations in tone and shade of blue-green. This ensures that the colors work together.
11 of 19
Cottage Color Scheme
white kitchen
Celery + Olive + white
This charming kitchen takes its cues form cottage style and features open shelving and Shaker-style cabinets. This kitchen uses a palette of red, olive and stained wood. However, it has a new take on these colors by replacing the darker green on the walls with light celery. The kitchen island is painted a darker shade of olive, while white paint brightens the cabinets.
12 of 19
Restful Green Color Scheme
Formal living room
Seafoam green + Rainy Day blue
The seascape art’s palest shades set the mood for the room. A Chesterfield sofa is covered in a grayish cloud-blue, while a rug with blue stripes underfoot adds a subtle touch. Accent pillows with patterns in blue and green are the only color variation amongst other pieces. A large animal print ottoman can completely change the mood of a room. The juxtaposition of the two pieces is unique and makes a strong statement. It also adds energy.
13 of 19
Posh Beach Color Scheme
Dining room with white bench
Spring Green + Peony and White
This sophisticated dining area takes inspiration from the polished style of beachgoers. The furnishings are simple and streamlined, like a summer shift. The white furnishings are highlighted by hot pink pillows, including one with a koi-fish print. A painted image of tropical flowers also stands out. Wallpaper with a woven pattern adds a vacation-like feel and softens the room’s strong attributes.
14 of 19
Cozy Green Color Scheme
Bedroom with green blanket
Mint Green + Indigo
The cool undertones of these pale green walls complement the wintery hues in the indigo floral bed coverlet and shiny metal bed. Knit throws and plaid rugs add a touch of warmth to the greens. The scalloped edge coverlet and casual, cozy furnishings, such as the plaid rug, add warmth to the cold undertones.
15 of 19
Rustic Color Scheme
Kitchen with Yellow Green Cabinets
Artichoke + Weathered wood
This country house’s kitchen island and rustic wood ceiling are complemented by a fresh green shade that is reminiscent of an artichoke. This kitchen, with its rustic barn-like feel and artichoke’s fibrous texture, celebrates Mother Nature’s more weathered side by playing off the colors of the vegetable. A wall of large windows, paired with the rough-hewn look, looks out at the wooded scene.
16 of 19
Forest Green Color Scheme
Victorian-Style Cabinets
Forest Green + Slate and Copper
The custom cabinetry in a glossy Frasier Fir green is painted from floor to ceiling. It gives off a woodsy, elegant feel. The blue undertones in this evergreen are complemented by leaded glass panels on doors, and black slate countertops and sinks. Copper pots bring a touch of brightness to this deep color scheme.
17 of 19
Vintage Green Color Scheme
Warm Kitchen Colors
Pistachio + Wine Red
This kitchen’s cabinetry is custom-painted to give it a unique personality. The pistachio green cabinets are expertly coordinated with the wine-red accents on the window treatments, undersink skirt and brass hardware. This brand new kitchen has a vintage feel thanks to the colors and finishes.
18 of 19
Mountainside Color Scheme
Open Dining Area
Teal Fog + Summery Stripes
This cozy breakfast nook takes its color cues directly from the misty mountains outside the window. The walls are a smoky shade of teal-green. The wooden chairs, with their thick wood slats and Adirondack style, are in keeping with the outdoor theme. The table is covered in a striped fabric that features stripes of yellow, coral green, blue, and teal.
19 of 19
Orchard Inspired Color Scheme
Green kitchen
Granny Smith Green + Apple Red
The color scheme of this retro-modern kitchen was inspired by the produce section. Apple green walls stand out against the white subway tiles and sleek cabinetry. Shiny apple-red, the complementary color of green, is a great accent color to create a fresh, modern style.